Read the report | >Check the documentation | Read about the rest of the day at RTI
Intro
What you need:
- Fast computer
- Lots of RAM
- Recent Linux installation
- Lots of hard disc space
- Firewire card
- DV Cam
If you aren't intending on making DVD or Full screen video you can get away with less.
Installing Firewire
Most recent distros contain a kernel that automatically recognises firewire cards.
After installing card, as root run
modprobe ohci1394
modprobe raw1394
modprobe video1394
This will enable the software packages to use the card. Add them to /etc/modules file if you want them to automatically load.
Software
We use 2 main packages, Kino and Cinelerra
Installing
The easiest way if using Mandrake is to use the 'Urpmi'
command. This makes sure any installed software has all the dependencies resolved.
Add some download locations to this by typing as root ' urpmi.addmedia plf ftp://knight.zarb.org/pub/plf/9.1 with hdlist.cz
urpmi.addmedia contrib ftp://ftp.mirror.ac.uk/sites/ sunsite.uio.no/pub/unix/Linux/Mandrake/Mandrake/9.1/contrib/ RPMS with ../../i586/Mandrake/base/hdlist2.cz'
The simply 'urpmi kino' and 'urpmi cinelerra'
We also recommend downloading and installing Blag Linux – a excellent distro based on Redhat that fits on 1 CD and is politically coming from where we're at. It comes with Kino by default
Download here
Kino
Kino is a simple 1 track video editor. It has ability to trim, cut and paste tracks and to export as various formats. It is mainly used for the capture and simple editing abilities:
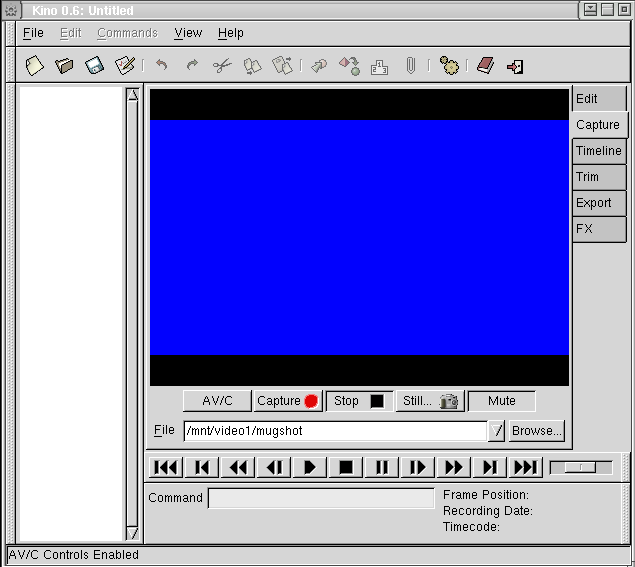
The screen below shows the capture interface. From here, you play Video and hit record. The options you want are 'Raw DV' as other wise it will be encoded in a format Cinerella can't open.
To use the clips in Cinelerra they need to be in uncompressed Quicktime format.
So after getting a set of clips from Kino's either save them as .MOV files, or uses a command line app called
'Dv utils' using the following command
"dv2mov inputfile.dv outputfile.mov"
Editing with Kino
Kino User Interface:
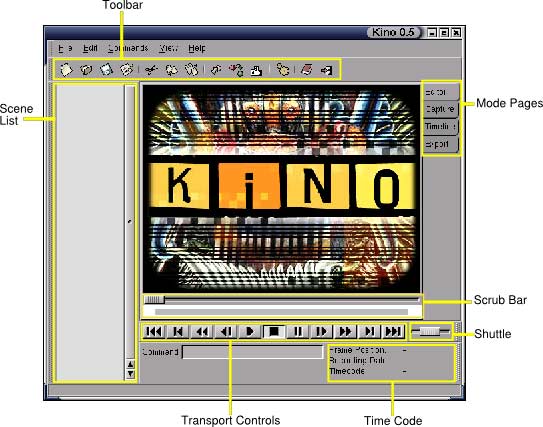
Toolbar
Use the tooltips. Briefly, they are:
- New, Open, Save, Preferences
- Cut, Copy, Paste Scene
- Insert file, Append file, Split Scene
- Toggle between 50%/100% views.
- Help, Exit
Timecode
Click the timecode labels to turn it on. In edit mode, timecode displays running movie timecode. In capture, timecode display source camera timecode.
Shuttle
Drag the shuttle to the left to play in reverse. Drag a little for slow play back, medium for normal, and a lot for fast. Drag the shuttle to the right to play forward. Release the shuttle to pause. The shuttle works in edit or capture mode.
Scene List
The scene list contains the timeline. Kino has only one track editing at the moment so editing is very simple.
To create an edit import the video file and in the edit window find sections that you want to remove.
To remove a section go to the beginning of it and click on Insert>Split scene
This splits the clip into two portions. After this find the end portion you want to remove and click on Insert>Split Scene again.
You now have three scenes, so click on the middle one in the Timeline and chose cut.
To fine tune edits use the Trim command. In this window you can scrub about and choose in and out points in the clip. After doing a trim click on edit and the Timeline will reflect the changes.
That is basically it! The scenes that have been created can be dragged up or down to change order, and new clips can be brought in to build up the edit.
FX
Kino implements some basic effects.
Go to the clip you want to alter and click on FX. In this window you can choose form a variety of options including Fades and transitions. Still frames can also be imported here, so titles can be created (in the Gimp of course ? ) at 720x576 px and saved as a TIFF. Setting the number of frames will affect the length of the effect or transition. I recommend doing all your fades after you're happy with the edit as it makes a bit of video comprising of the video clip and the effect so removing the fade will remove a bit of the video
Export
In the timeline, export still frames, or export audio modes, click a scene to set the range.
Cinelerra
Common error #1
- Trying to import files that use proprietary codecs - they won't work, so don't bother.
Normally people then say Cinelerra is crap, but it says very clearly upfront that it will not work with proprietry codecs. YOU MUST use uncompressed QT .MOV files...update - the latest version of Kino has the ability to export directly as a MOV file so you won't need to use the dv2mov tool
Fire up Cinelerra and set the project settings to match the settings of the video you will be importing. If you don't know use a command line tool called 'qtinfo'
Go to format > settings and enter info. normally you would keep it the size you captured it at, i.e 720 x 576 , 25 FPS If you're making video for the web then you can resize your captured footage,
Then on the video track , right click and choose 'resize track' entering the previous details.
The interface is quite ugly and consists of- The 'Program' window where the timeline is with the video/audio tracks.
- The 'Resource' window where you strore all the media you will be using
- The 'Viewer' window where you can watch clips and edit them
- The Compositer' where the final movie is displayed
EditingImport some files by clicking on File>Load files, and choose the files you want. There are several possibilities for how this happens. You can also choose from several 'insertion strategies' which are - Overwite previous projects on the timeline
- insert in a new track on the timeline
- Insert as resources (which is the one we want)
Import a video file by dragging onto the timeline. By default it goes to beginning of track. Other options are to use In and Out points. Go to where you want the clip to be inserted, click on [ then right click on the file in the resource window and choose 'Paste' Drag a clip to the viewer, and from here you can choose what you want on the timeline by using the In and Out points. Go to the timeline and click on where you want it to go (using the In point). Either overwrite the other video using 'Overwrite' or 'Splice' to insert the new clip in the middle of the other. - Zoom in to timeline by using arrows on keyboard or button with timleine numbers on (bottom left)
Tweaking edit points
You can tweak the exact length of a particular shot by dragging the handles between the edits. The exact result depends on what mouse button you hold down while dragging ~(see table at bottom for full explanations)
Moving seperate clips about The easiest way i've seen to move edits about on the timeline is to doubleclick on the edit 9in cut'n'paste mode), press [ and ] to put In and Out points at start and end of clip then select 'cut'. Move to where you want on the timeline and press [ then click paste. Selecting a portion of the timeline then choosing 'Insert silence' moves whole edits along or you can drad using right mouse button Transitions + effects Effects live in the Resources window. Drag the effect on to the clip, and resize it. It is represented by a red bar underneath the video. Use the left button to enlarge or shrink the effect .Right click on the bar, and select 'show' to fiddle with the clip effect. Take a look in the Composite window and adjust if necessary
Adding Titles Titles are found in the Video effects section. Drag it onto the video.Right click then select 'Show'
There is an font window, uses X Y co-ordinates to place text.
Extra tracks This is why Cinelerra is good - can do very interesting things with multitracks. Choose 'Video>Add track' to make extra tracks. If your video has audio add the tracks for that too. Drag video onto extra tracks, and position.Arming tracks.The little red button by the track name determines whether the track is affected by any editing. Arm the track by clicking on red button. Shift click arms that track and disarms rest. Fading Video/Audio
Arm the track you want to fade in and out. Make sure the little Key symbol is highlighted. Select 'View > Show Fade Keyframes' You will get a white line on the track. Add nodes to it then drag to fade video/audio Other cool track effectsClicking the arrow on the track name reveals a set of overlay effects for video, like addition/subtract.
Alpha channel
Import your alpha channel as a TGA file on a video layer above the others to have masked areas
Compositing split screen video
To have multiple video on screen, click the 'Projector' button on the Composite window, and make sure the keyfram button is OFF.
Shift click the red rectangle and move about.This will change size of video, then can be dragged around. This action affects whole video track not just clip
If you do this with Keyframes on, you can expand or contract and move video over time. Go to a section, and resize. Move further on and resize. By doing this you can build up complex layers and movement.Playing back will show how it looks over time.
Rendering At the moment there's not a lot of outputs from Cinelerra (due to proprietery codecs) . For rendering back to DV tape, for video select 'DV' and for audio select 'Two's Complement compression'
Convert back to .DV file using dvmov2dv program i.e "dvmov2dv inputfile.mov > outputfile.dv", then record to DV tape using Kino
URLSMaking DVDs with Kino + Cinelerra:
Fantastic general video on linux tutorial :
Cinelerras documentation:
Table trying to make sense of weird right click editing gestures
| |
Right Click Mouse (Drag all following edits) Editing results |
| Mouse direction |
Where on Clip |
Which arrow |
What happens |
| Left |
Begin |
<- |
Lengthens clip with material from clip source at beginning + space and other clips move to the right. If no other material in clip source nothing happens |
| Right |
Begin |
<- |
Shortens clip removing material from end, and space and other clips move left |
| Left |
Begin |
-> |
Moves all clips and space to left |
| Right |
Begin |
-> |
Moves all clips and space to the right |
| Left |
End |
<- |
Space between clips increases |
| Right |
End |
<- |
Space between clips decreases |
| Left |
End |
-> |
Shortens clip removing material from end, and space and other clips move left. |
| Right |
End |
-> |
Lengthens clip with material from clip source at the end + space and other clips move to the right. If no other material in clip source nothing happens |
fin Read the report | >Check the documentation | Read about the rest of the day at RTI |
